Planning Landscape Photos, Part 2: Capturing Your Perfect Image
In landscape photography, we usually want to capture either the grandeur or the subtlety of the natural world, and sometimes both at once. It’s the light that dictates the scene’s atmosphere, and planning for it is all-important.
Spontaneity can occasionally yield beautiful results. Sometimes, we get lucky. However, behind most captivating landscape images lies meticulous planning. Consistently creating striking landscape photographs that match your style requires intentional preparation. Therefore, an understanding of environmental variables becomes critical. The location, timing, equipment, meteorology, and composition all need to work together.
Take the following scene. It’s the end of the pier in the town where I live. The first image is what one might expect if one wanders around with a camera, sees an opportunity, and snaps it.
But see what happens if we change the time of day and head out before dawn?
Or we might wait for the golden hour to get a shot.
Alternatively, we could head out on a windy morning and use an ND filter.
Although those photos were taken at slightly different angles, they show the same scene. We can position and aim the camera in a multitude of ways and choose how we expose the shot. However, the main difference between them is the quality of the light. I have countless unique variations of that vista, and each one is different from the next because the light always changes.
Almost every effective landscape (or seascape) photo shoot begins with an intention. We have an idea of what we want to achieve. Therefore, if we plan, we can wait for the right conditions to take that photo; there’s little point in planning a golden sunrise shoot tomorrow if there’s going to be heavy cloud, or a low-contrast, foggy shot on a bright, hot morning.
Alternatively, we take a slightly different approach: we consider the conditions and then decide what kind of photo we want. It’s stormy today, so it’ll be dark, moody photos.
When making those decisions, we define what we want to communicate through our images. Are we after stillness, drama, vastness, or intimacy?
Having identified the mood of the photo, we next consider the choices that will best serve us. Obviously, there is the location. But we will also consider the time of day, the focal length, and what filters we will use on the lens.
Establishing our intent ensures that our planning is purposeful and aligned with our artistic vision.
Creating a mood board is a useful approach to planning your shoot. By bringing ideas together, we can formulate in our minds what it is we want to achieve.
There are dozens of mood board apps out there, including Pinterest, Figma, Vision Board, and Morpholio, to name but a few. I’ve used the free Libre Office presentation tool, Impress. It works similarly to PowerPoint, and it is easy to place multiple related images on a single slide and then related topics on adjacent slides. I also like that the file is private; it is saved locally and not shared with the wider world.
If I want to create a mood board from my own images, I find Excire is a fabulous tool for doing that. I can type a couple of words, and the images that match that description appear.
Among its wide range of features, it helps you discover your images related to a particular topic. If I type in “Pier”, I get a lot of results featuring that feature. I could equally search for “Pier at sunrise” or “Pier long exposure” and get different results.
You don’t even need to have tagged the photos. The following is the result I get when I search for “Red and white beacon”, which I have never used as a tag.
The best landscape photography planning involves scouting the location. That has never been easier than today, with Google Earth giving you a pretty good aerial view, as well as street view of popular locations.
Photographers can also study angles, times, and focal lengths used at a given location using platforms like Flickr and 500px. They give examples of what has already been captured. There’s nothing wrong with photographing what others have done before; it’s a great way to learn.
However, it is worth avoiding clichés by researching what hasn’t been captured as often, if at all. For instance, many people in my area roll their eyes when they see yet another photo of Bamburgh Castle, which is a few miles from where I live.
By scouting digitally, you can compile a preliminary list of promising vantage points, record GPS coordinates, consider alternative compositions, and assess whether secondary viewpoints are available.
Nevertheless, on Google Earth, you cannot always assess accessibility. Neither does it show temporary changes to the landscape. Therefore, visiting the location beforehand is often the best approach.
For example, where I live, the county is dotted with over 70 castles. A few years ago, many disappointed photographers came here. They drove across the causeway to Holy Island when the low-tide access coincided with sunrise. However, after all that planning and travel, they found that the 480-year-old castle was covered with scaffolding for important renovations.
Moreover, a visit in good light will identify potentially dangerous features, such as unguarded cliffs and even the proximity of wild or aggressive farm animals.
Many photographers buy PhotoPills for their phones. It has a range of useful features, but two are the ones I use most. The Planner module shows the direction of the sun and the moon at any given day and time. Then there is the DoF module, which provides depth-of-field and hyperfocal-distance values for any given focal length and aperture combination. It’s fabulous for planning a shot.
Even if your physical scouting happens only an hour or so before the shoot, it lets you find good vantage points and explore foreground elements such as rocks, flowers, water pools, or driftwood you can include in your photo.
During that time, you can take images to assess compositions with different focal lengths, apertures, and focus point settings. A mistake many people make is arriving on location and then planting the camera in the most obvious spot. Moving around, getting closer or further back, and raising or lowering your camera height may all lead to better photos.
Good light is arguably the single most important factor in landscape photography. Planning must therefore revolve around predicting and interpreting where the sun (or moon) will be and how it will interact with the environment. The light’s direction, intensity, and height change with the seasons, so planning for that becomes essential. Likewise, weather affects lighting conditions.
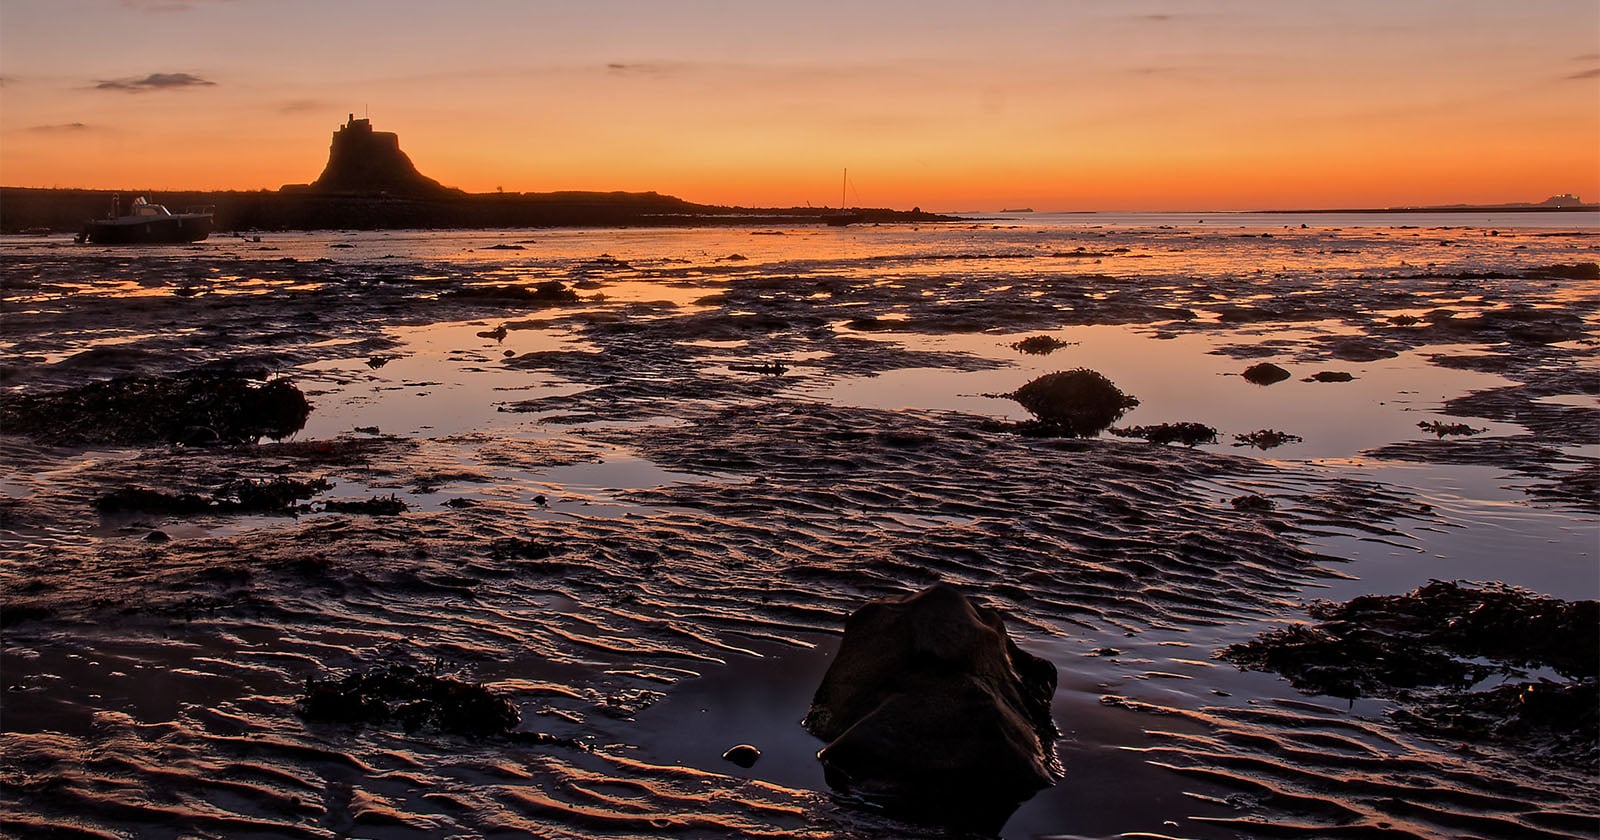
The photos early in this article demonstrate that changing conditions can completely alter the mood of a photo. The featured image right at the top, I shot fourteen years ago. The unusual evening light, combined with a low-lying mist at sunset, yielded a collection of tranquil images. Compare that to this scene shot mid-morning in Albania.
Clouds, mist, storms, and shafts of sunlight add drama to a photo. Meanwhile, clear skies may lend themselves to minimalist compositions. Therefore, a basic understanding of how the weather works is useful for photographers. Knowing about weather patterns and the resulting light will help get better photos.
There’s a fabulous new website called earth.gl that I use all the time now. It is specifically designed for photographers to assess the light and other conditions. In addition to many other functions, it tells you the sun and moon directions and the light quality for the time of day and the weather. When I first drafted this article, it described the shifting light as the clouds moved and how I could use the clouds as “nature’s softbox.” It also told me that the best light on that day would be at 15:32, when there will be a rare halo light. Today, the suggestions are different.
One section of the site highlights the peak golden and blue-hour times, the anticipated sunset color, sky clarity, how saturated colors will appear, and the amount of contrast in the scene.
The weather information also includes wind speed and direction, the height and type of clouds, and the direction in which they will be traveling. That’s great if you want to use moving clouds to draw your eye into the shot.
Its tide times and heights are vital information for coastal photographers like me. Additionally, it has aurora predictions and has a feature to plan routes for your photo walk.
Earth.gl isn’t just aimed at landscape photographers; it also lists the birds, mammals, plants, trees, insects, and amphibians seen in the area.
It also allows you to upload photos. I contacted the developer, and he told me you will be able to connect with a limited number of other users through iPhone and Android apps that will be released soon.
There is some overlap with the light direction feature in PhotoPills. However, earth.gl’s user interface is far easier to understand. When used in conjunction with a depth-of-field calculator, earth.gl is more accessible and has all the information most landscape photographers need.
I cannot emphasize enough how important planning is to getting better photos.